Wednesday, December 29, 2010

Looking Back on 2010 with ADDIE

By Shelley A. Gable

Though a variety of models guide our instructional design work, I’d argue that ADDIE functions as the basic backbone of the process. Just about every model, trend, and best practice in the field supports one of the phases of ADDIE.

So with this in mind, it seems appropriate to take a look at the articles posted to this blog over the past year and organize them according to how they jive with ADDIE.

A = Analysis (analyze the problem/opportunity and its causes)

Two of this year’s articles primarily address analysis. Rethink Refresher Training suggests that we take time to analyze the cause of performance gaps. eLearning and an Aging Workforce looks at a specific angle of audience analysis.


D = Design (design the solution, create a blueprint)

Anatomy of an eLearning Lesson: Nine Events of Instruction and Anatomy of an eLearning Lesson: Merrill’s First Principles each describe models that guide eLearning lesson design from start to finish. Three more articles focus on specific components of those models:


As organizations continually move toward adopting eLearning and even converting instructor-led training to eLearning, the following articles offer us guidance:


Two more articles offer design-oriented food for thought:


D = Development (develop the solution)

After organizing training content and identifying instructional activities during the design phase, we’re ready to put fingers on keyboard to write the instructional materials that learners touch. A few articles from this year addressed writing:


Of course, it’s the programming we do with eLearning authoring tools that results in a polished, interactive learning product. Below are links to articles that offer programming tips:


I = Implementation (implement the solution)

Though several articles briefly touched on eLearning implementation and change management this year, only one addressed it as a focal point: eLearning as Part of a Change Management Effort.


E = Evaluation (measure the solution’s effectiveness)

A post-training evaluation effort allows us to answer the question – did it work? Here are links to articles that address evaluation methodologies:


More to come...

At a glance, we seem to address the design part of the process most frequently on this site. As we move into 2011, we’ll continue to share ideas regarding the field’s theories, models, trends, and best practices. And of course, if there are topics that you’re especially interested in seeing, we’re always open to suggestions!

Happy new year!

Wednesday, December 15, 2010

Brainstorming for eLearning: Rules of Brainstorming

By Shelley A. Gable

We know that some of the most effective training follows a problem-centered approach, engages learners, is abundant with practice and coaching, and simulates the work environment as closely as possible.

Easier said than done, right?

Let’s be honest – it’s challenging to create training like that (especially with the time constraints most of us work within!). If it were easy, we wouldn’t have so much eLearning with the page-turner design. So how do we do better?

How about rounding up some colleagues for a brainstorming session?

Brainstorming is fun, and most people are flattered when asked to share their expertise, so getting a few peers together to exchange ideas for an hour may be easier than you’d expect.

Once you’ve gathered your brainstorming team, briefly explain the goals and audience for your project. Don’t linger too much on resource limitations at this point – you can revisit that later. And be sure to explain what you’re hoping to gain from the brainstorming session. For example, are you looking for ways to make your audience care about compliance regulations? Or perhaps you’re trying to apply a problem-centered design to a lesson that’s currently a bullet point-driven lecture. Whatever the case, provide your team with a focus.

Then, introduce them to the rules of brainstorming. In this context, rules aren’t intended to inhibit...instead, they help ensure that ideas flow freely.

Brainstorming Rule #1: Withhold judgment.
Don’t silence an idea because you initially think of more drawbacks than advantages to doing it. And similarly, resist the temptation to point out flaws in others’ ideas. You can nit-pick at them later. But during the brainstorming session, encourage everyone to tell you everything they think of.

Brainstorming Rule #2: Quantity, quantity, quantity.
The more ideas you have on the table, the more likely you are to come across a few gems. Focusing on rapid-fire quantity can also have the side effect of not allowing time for premature judgment. To help ensure variety, encourage ideas from everyone involved. Even repetition is okay – a repeat idea presented in a slightly different way could take you to places that the original didn’t.

Brainstorming Rule #3: Get crazy.
In a brainstorming session, no idea is unrealistic. Tell the team that you want – even expect – wild, off-the-wall ideas. To make good on this rule, be sure to record every idea suggested. Even if it seems ridiculous. Even if it was mentioned as a joke. After all, you never know when a far-fetched idea will inspire a feasible yet clever suggestion for someone else.

Brainstorming Rule #4: Build.
Encourage the team to build on one another’s ideas or find ways to combine ideas. This technique can become especially handy if the group slips into an idea lull. Grab an idea or two that jump out at you and suggest that the team explore them further. How would they approach it? Pose “what if” questions. Similarly, you might choose a seemingly unrealistic idea and ask for suggestions on how to carry it out if you had total freedom with your project.

Too often, we try to conquer the world on our own. Though I like to generate ideas independently when I first begin a new project, some of my best lesson designs were inspired by conversations where my peers allowed me to pick their brains for a while.

Have you found brainstorming helpful? It’d be great to see some success stories in the comments following this post. Additional brainstorming tips are welcome too.

Wednesday, December 1, 2010

Develop Yourself in Addition to Training

By Shelley A. Gable

While we work diligently to develop learning experiences that help our clients meet their business goals, we must also engage in continuous learning ourselves. What types of learning experiences do you pursue? How do you keep up on trends and generate new ideas?

Below are five professional development opportunities to consider for yourself…

--1-- Pursue Stretch Assignments
Stretch assignments involve taking on a project that requires using new skills or exercising existing skills in new ways. For instance, if you’re interested in change management but haven’t had a chance to apply that knowledge, you might offer to help shape your client’s change strategy as part of your next training project.

--2-- Attend Events
Attending national conferences hosted by professional associations can be informative and inspiring. Area events by local chapters can have a similar effect. Even if the topic of a local program isn’t right up your alley, the conversations you have with industry peers can be a helpful source of ideas. Don’t have many events available in your area? Check out live webinars, too.

A few organizations I pay attention to include the American Society of Training and Development (ASTD), International Society for Performance Improvement (ISPI), and the eLearning Guild.

--3-- Engage in Online Networking
Online networks offer an outlet for following industry trends and generating discussion around your areas of interest. Get links to recent articles from training professionals and organizations on Twitter. Participate in #lrnchat on Twitter on Thursdays for a lively exchange of ideas with others engaged in the field. Pose questions on relevant LinkedIn discussion groups to get advice for your training projects.

--4-- Skim the Blogosphere
The fact that you’re here may be a sign that you’re doing this already. Regularly visiting a handful of training-related blogs is an efficient way to keep up on trends by seeing what people are writing about. Some bloggers share examples of their work, allowing you to glean ideas for your own projects.

Consider using an RSS (Really Simple Syndication) feed to subscribe to several blogs. An RSS feed posts headlines and short summaries of articles from several blogs on a single page, so you can easily skim headlines like you would in a magazine. A few popular RSS readers include Feedly (my favorite), Google Reader, and My Yahoo (of course, there’s many more!).

--5-- Keep Up with Research
While informal exchanges with others in the field can be good for generating ideas, published research offers insight on what works. Data-driven research findings confirm the extent that models, theories, and techniques work in a variety of situations. Published research in the field can help us be confident that we’re recommending evidence-based practices to our clients.

A few relevant journals include Performance Improvement Journal, Journal of Workplace Learning, and Human Resource Development Quarterly. Of course, many others exist too. To keep up with them, you can subscribe to their alerts or access the journals at a local university.

Please add to the list!
Which organizations’ events do you attend? What journals do you read? Which RSS reader do you prefer? Are there other professional development opportunities you regularly pursue? Please, leave a comment and share your suggestions.

Thursday, November 18, 2010

Evaluating eLearning in a Crunch

By Shelley A. Gable

For anyone who’s in the midst of designing an eLearning course, have you figured out how you’re going to evaluate its success?

- Some of you are proudly nodding.
- Some may be thinking that it’s not necessary.
- Others would like to evaluate, but lack the time and/or know-how to do so.

For those of you in the first category...kudos. You’re onto something. I hope you’ll comment on this post with some of your reflections and advice on evaluation.

For those in the second category...consider that evaluation allows us to confirm with data that what we’re doing works. Without some form of evaluation, how can we know for sure? Besides, presenting data-based evaluation results to stakeholders helps build our credibility.

Now about that third category...let’s spend some time on this. Though much of what’s written about evaluation tends to make it sound like a huge undertaking, it doesn’t have to be. A small-scale, simple evaluation can be better than no evaluation effort at all.

If you think you might be able to spare a few hours on what could prove to be an immensely valuable activity, read on.

First, identify the questions your evaluation should answer.

Take a few minutes to brainstorm. Maybe even ask a colleague or two to brainstorm with you. Even if you identify several questions you would like to answer, you can trim your list down to a few priority questions to keep the evaluation effort small and manageable.

Consider questions like:
- How easy was the eLearning course and its activities to use?
- Which objectives did learners struggle to accomplish?
- Did learners perform as expected on the job?

Next, determine who can help you answer the questions and how you can get that data.

Back to brainstorming.

If your time is limited, think simplicity. For instance, no rule says that a questionnaire must be long. If you opt to survey learners, consider putting together a questionnaire with a handful of straight-forward Likert-scale questions (perhaps with one open comments area at the end). Ratings on even a few items should give you a sense of how favorably learners tended to view the course.

Did your eLearning course include quizzes or knowledge checks that you can pull results for?

Need to get a sense for on-the-job performance? While there are many elaborate ways to do this, you have simple options too. If you’re dealing with performance measures that are already tracked, it may be as simple as requesting the appropriate reports and asking someone to spend an hour teaching you how to interpret them. If the performance measures aren’t so clear, you might send a quick email to learners’ managers asking for their impressions.

Now, collect the data and analyze it.

If you’re in a crunch to do this quickly, don’t worry about dusting off your statistics textbook. Keep thinking simple. For instance, you might tally the number of favorable and unfavorable responses related to your original questions. Or simply categorize the comments you received to help you identify trends.

Finally, share your impressions.

An important component of any evaluation effort is communicating the results. Admittedly, if the evaluation was quite limited in scope and followed some of the loosely structured advice above, you probably can’t claim to be able to tell the entire story. But that’s okay.

As part of your communication, openly discuss your limitations. Tell your stakeholders what questions are still unanswered and any new questions that have been raised. You might even recommend additional evaluation measures as next steps.

If stakeholders get a taste of what an evaluation can reveal and they want to know more, your small-scale efforts might earn you resources for a more thorough evaluation project.

What else?

What evaluation options do you use that are simple, quick, and informative?

Friday, October 29, 2010

6 Techniques that Stimulate Recall in eLearning

By Shelley A. Gable

If you’re familiar with Gagne’s nine events of instruction, you know that one of the early steps in the instructional design model involves stimulating recall of learners’ prior knowledge. Typically, this step is listed after gaining attention and stating the training’s objectives.

Why stimulate prior knowledge toward the beginning of an eLearning lesson?
  • It helps learners retain newly learned information by building on existing knowledge.
  • It can serve as a brief review of recently learned information that the subsequent content is intended to build upon.

So what can we do to stimulate recall of prior knowledge in an eLearning lesson?

--1-- Ask learners to describe a related personal experience.
For example, when starting training related to customer service skills, you might ask learners to recall their own experiences of receiving good and/or bad service and identify the characteristics of those experiences.

--2-- Prompt learners to brainstorm ideas related to the content.
For example, training related to coaching employees might start by presenting an employee issue and asking learners to list possible ways to respond to it.

--3-- Quiz learners on related knowledge they already have.
Pose a series of knowledge check questions that quiz learners on related knowledge that the lesson builds on.

--4-- Prompt learners to start solving a problem, applying existing knowledge.
For instance, you might present a basic scenario that a learner can partially resolve with existing knowledge. Then, elaborate on the scenario in a way that the learner can fully resolve with the help of the newly presented content.

--5-- Ask learners to anticipate elements of the upcoming content.
For example, product training might ask learners to list examples of questions customers might ask about the products or list features of similar products they’re familiar with.

--6-- Ask learners to identify what they already know and what they don’t know about a particular topic.
Admittedly, this technique may be challenging within an eLearning lesson, but it could be facilitated in the instructor-led portion of a blended training approach. This technique can also function to gain learners’ attention at the start of training and prompt them to set learning goals.

While these are all potentially effective methods for stimulating recall or prior knowledge (depending on your audience, the content, etc.), here are two cautions to keep in mind when designing this portion of the training:
  • Avoid spending too much time on a rote review of existing knowledge. While it may be worthwhile to spend time on an activity that inspires learners to view existing knowledge in a different light, learners will likely grow impatient with a review that feels basic and lacks new insight.
  • If the training content contradicts learners existing knowledge, then you may need to use this “recall” step to make a case for the need to change and gain buy-in. A solid change management strategy can help with this.

What additional advice would you offer on this topic? What other techniques have you used to stimulate recall of prior knowledge?

Monday, October 25, 2010

eLearning and an Aging Workforce

By Shelley A. Gable

It seems like every major news outlet runs the occasional story about how the United States workforce is aging. Between baby boomers approaching retirement and retirees reentering the workforce to supplement their income, statistics from a variety of sources indicate that a large proportion of our workforce is 50+.

So what does this mean for eLearning?

Interestingly, in the past two years, I’ve known two instructional designers, in two different organizations, who were a part of teams that were tasked with answering this question for their companies. In both instances, my colleagues found literature that described what eLearning should look like for older learners. However, they also found inconsistent research results on the topic.

In the end, each team concluded that it wasn’t necessary to design eLearning differently based on the age distribution of a particular population. Instead, they suggested that the proper application of sound instructional design principles would ensure that all age groups received appropriate training.

Let’s take a look at some of the considerations that emerged for both teams…

A common stereotype of older generations is that they struggle with technology. Clearly this is a broad generalization that isn’t true for many, but we have to admit that it is true for some. I have several friends who, like myself, regularly receive phone calls from our not-yet-retired parents seeking troubleshooting for something seemingly basic on the computer.

That said, well-designed eLearning should feel intuitive and guide learners on where to click if a particular screen is somehow different from the rest. If your organization regularly deploys eLearning, templates that offer a consistent look and feel across courses can also make eLearning easier to use. And of course, an instructions page at the start of each eLearning course (with an “instructions” or “help” button available throughout the course) can also help everyone start with confidence.

A common theme in the literature addressing generations and learning preferences is that older generations tend to prefer a linear learning structure while younger generations prefer a more exploratory structure. Maybe this is true, maybe it’s not. Regardless, this is an area where instructional design principles can guide us.

For designers who consider learning style differences (and I realize that there’s debate in the field around the significance of learning styles), the preferences expressed by older and younger learners are consistent with a common dichotomy found in several learning style and personality type models. Many of these models include four types, where a couple of these types tend toward linear thinking and a couple prefer random or non-sequential thinking. Therefore, those in the habit of designing in a way that caters to varying styles are likely already accommodating these generational differences as well.

To consider this from another angle, we know that we should sequence instruction to build from simple to complex content. We also know that adult learners enter training with experience and knowledge that we must acknowledge. If we linger too long in teaching familiar basics, we risk losing learners’ attention and the course’s credibility. But yet, those unfamiliar with the basics may struggle with more advanced content without ample time in the “simple” end of the continuum. So surely, even the more linear learners would appreciate bypassing familiar content in favor of focusing on what they need to know. Again, the key here is clear instructions for the learner and a logical, even intuitive, interface.

In the design phase of a training project, we should consider what types of flexibility might be designed into the course. For instance, I recently took an online compliance course that suggested a linear flow for working through the content, but also allowed learners to skip around. In the end, I had to correctly resolve five scenarios in the course in order to successfully complete it. I could either complete a series of lessons that led up to each scenario, or I could jump to the scenario and the feedback would tell me what lessons I should complete based on my incorrect answers. As one who likes to jump around and explore, I was satisfied with this design. And the linear path that was suggested at the beginning of the course would likely satisfy those with a sequential preference.

What do you think?

Using the insights my colleagues discussed with me, I’ve attempted to build a case here suggesting that we don’t need to design eLearning differently to accommodate our aging workforce, as long as we’re basing our design on sound instructional principles anyway. But I don’t doubt that there are compelling arguments to suggest otherwise that I might not have considered yet. So if some of those opposing arguments come to mind for you, please share!

Thursday, September 30, 2010

7 Habits of Highly Effective Instructional Designers

By Shelley A. Gable

Stephen Covey is a well-known organizational consultant, perhaps especially well known for his book, The 7 Habits of Highly Effective People. I was thinking about the book the other day, and I also started thinking about how those habits might translate for instructional design specifically.

Here’s what I came up with…

Habit 1: Be proactive.

Covey characterizes being proactive as the ability to shape your situation through your choices. It's about being the source of solutions, rather than waiting for others to solve problems.

As instructional designers, we can be proactive by observing business trends and building relationships with our clients. Rather than waiting for clients to come to us with requests, we can keep up with their business well enough to anticipate their needs. To suggest opportunities they might not think of. To offer creative solutions for the problems that keep them up at night, even if they haven't specifically asked us to solve those problems.

Habit 2: Begin with the end in mind.

In his book, Covey encourages readers to visualize what they want in life and develop a personal mission. The idea is that knowing what you want in life allows you to act in ways that help you realize your goals.

This is what we should do as instructional designers as well. Before we start typing objectives, we need to understand the business goals that training is supposed to accomplish. What are the specific results the client expects to see? And where is the organization now, relative to those results? Our objectives, and all development work that follows, should directly help to close that gap.

Habit 3: Put first things first.

This habit focuses on prioritizing what's important to you in life and making decisions that sync with those priorities.

This might be a loose interpretation of this habit...but when I think about it from an instructional design perspective, it makes me think about working with subject matter experts (SMEs).

On the one hand, SMEs often want everything they know to make it into training. To them, everything they can think of is important. So, we have to prioritize the information we receive from them, according to how that information aligns with training and business goals. We have to use that analysis to determine what goes into training, what stays out, and how much time to allocate to the specific pieces.

On the other hand, SMEs also tend to neglect to convey the most basic (and often most important!) information. Information that's so obvious and intuitive for them because of their expertise, that they forget that it might not be as obvious to others. So with our understanding of the client's needs and what it takes to accomplish the client's goals, we have to know what questions to ask to solicit the information that is most critical for training.

Habit 4: Think win/win.

Covey describes the importance of building mutually beneficial relationships. Relationships that are rewarding for everyone involved.

I sometimes experience a tug-of-war with clients over training resources. They want training fast and cheap, and I fret over the possibility that developing too fast and too cheap may result in training that isn't very good. Cutting corners in training development not only makes the work feel less inspiring from my perspective, but it also compromises the learner.

But ah ha! Now we're on to something.

If the learner's experience and ability to learn is compromised due to a lack of resources for training, then that's likely to negatively impact the client's goals. So when it comes to negotiating for training project resources, the link between the learner experience and business goals can be a key part of the conversation. If you can use that link to build a strong case that yields the resources you need, you get that all-around win - an engaging project for you, an effective learning experience for the learner, and the desired results for the client.

Habit 5: Seek first to understand, then to be understood.

In addressing this habit, Covey emphasizes active listening skills and empathy. After you understand someone, you can better relate to that person and help that individual understand you.

This habit reminds me of cause analysis. Rather than jumping to a recommended solution immediately after a client comes to us with a problem, we need to take the time to investigate the potential causes of the problem. Our cause analysis then helps inform our training design and other supporting interventions, and relating our recommendations directly to those causes can help us earn the buy-in to move forward.

Habit 6: Synergize.

Synergy is about building a diverse team, where the whole of the team is greater than the sum of its parts.

This habit seems to capture the spirit of teamwork that is critical to instructional design. Instructional design is more than taking a pile of content and figuring out how to teach it. Depending on the role of the designer in an organization, the process is largely consulting-oriented and requires input from people in a variety of roles and at a variety of levels in the organization - often from executive-level project sponsors to the frontline employees impacted by the training. For us, this habit is about being able to work with people across organization levels and functions, and possibly with varying agendas, to produce effective training.

Habit 7: Sharpening the saw.

Covey included this habit to encourage us to invest in ourselves and indefinitely continue our education.

As with any profession, we need to invest in ourselves and continue to develop our skills. The opportunities for this abound, from stretch assignments at work, to reading what’s written in the field, to attending classes, conferences, or seminars.

What do you think?

So that’s my interpretation of Covey’s seven habits, as they apply to instructional design. What are your interpretations?

Wednesday, September 15, 2010

eLearning as Part of a Change Management Effort

By Shelley A. Gable

Have you ever thought, “well, that was a waste of time; it’s not like I’m gonna do anything differently now;” as you completed a training course?

I’ll admit it: I have.

A less-than-compelling training design might be to blame. But maybe not.

A lot of smart people in the field often remind us that a training event alone rarely accomplishes an organization’s goals. In order for training to succeed, it must be supported by other efforts in the organization. Change management models offer a framework for thinking about this.

Many change management models exist, and I’m opting to focus on Jeffrey M. Hiatt’s ADKAR model for this post – it’s simple and captures most of the components included in other models.

Let’s look at the ADKAR change management model against the backdrop of a project I worked on a while back, which involved teaching customer service representatives a conversation flow for resolving customer complaints. Prior to the training, the organization had no formalized model or flow – just a list of tips for talking with angry customers. The purpose of the flow was to ensure that customer complaints were resolved effectively and consistently (ultimately increasing the likelihood that customers with a dissatisfying experience would receive a satisfactory resolution and remain loyal to the company).

A = Awareness of the need to change
In this model, awareness is more than an email announcement. Building awareness requires a communication process that attempts to shape perceptions by building a case for the need to change. At this point, it isn’t necessarily critical to actually announce what the forthcoming solution is. Rather, the focus is on explaining why a change is necessary to solve a problem, seize an opportunity, etc.

In our example, supervisors built awareness by talking to employees individually and in team meetings about the inconsistent handling of customer complaints. They shared data on the rate of repeat business from customers who have complained and explained the benefits of improving that rate. They engaged employees by asking them what they thought was most challenging about handling complaints (many responded that they often didn’t know what to say to upset customers).

D = Desire to change
As creatures of habit, we often feel burdened when change is imposed on us. While it may be easy to assume that people will change if their job requires it, the truth is that people tend to do what they want to do, regardless of whether it aligns with what the organization wants. So it makes sense that inspiring a desire to change would help things move along more smoothly.

In our example, supervisors participated in brainstorming sessions to identify likely sources of resistance and support for the change, so that communication and training would address both by mitigating resistance and leveraging supporting factors. Since employees were evaluated on their handling of customer complaints, supervisors also explained how having a consistent flow would improve those metrics (tapping into the “What’s In It For Me” factor) and make these conversations feel easier.

K = Knowledge to change
This is the training component of the change model. Teaching employees the knowledge and skill needed to change their behaviors so that the organization can meet its goals. This includes not only the training event, but also job aids and any other needed forms of performance support.

A = Ability to change
Have you ever attended training or a conference and become excited about an idea, only to find yourself unable to apply it when you got back to work? I’ve been there. I think most of us in training understand the importance of allowing people to apply newly learned knowledge and skills on the job as soon as possible in order to ensure that it sticks.

R = Reinforcing the change
This involves continuing to reinforce the change after training by celebrating and recognizing successes, rewarding employees for their success, and adapting the change into existing monitoring processes and performance measures for ongoing accountability.

In our example, supervisors offered small incentives during the two weeks that followed training. They shared employees’ success stories during team meetings and as model examples for individual coaching. And they slightly modified their existing performance measures related to customer complaints to more clearly align them with the new flow.

So what?
The moral of the story is that training should be part of a larger change management effort in order for it to stick and accomplish an organization’s goals. Are your eLearning projects typically part of a change management effort? And if so, what successes and challenges have you encountered?

Tuesday, August 31, 2010

Using eLearning in a Blended Approach

By Shelley A. Gable

In listing the benefits of eLearning, training folks often cite its flexibility – it’s available on-demand, allows learners to progress at their own pace, is easily deployed to a geographically dispersed audience, etc.

eLearning’s flexibility can be especially handy when it’s included as part of a blended learning approach. Below are a few ways I’ve seen eLearning used to complement other delivery methods in projects I’ve worked on.

-1- Pre-work for instructor-led training
A few years ago, I helped redesign an existing public speaking course for supervisors. The original version took place entirely in the classroom and taught the basics through application. The redesigned version assigned an eLearning lesson as pre-work to introduce the elements of a presentation. Learners were also instructed to outline a presentation, accounting for each of the elements they learned about in the eLearning lesson. This design allowed the classroom portion to function more like a workshop.

Learner feedback to the blended approach was overwhelmingly positive. Each time the original version was taught, some learners wished that more time had been spent on the basics, while others felt that it should be skipped entirely. By teaching the basics in an eLearning lesson as pre-work, learners could spend the time they needed on that portion of the training.

WARNING: While all this sounds good...only use eLearning as pre-work if you’re confident the audience will actually complete it (ideally, if you have a way to hold them accountable for completion). I worked on another training project shortly after, which also included eLearning pre-work. Due to heavy workloads, very few of those learners actually completed it, which threw off the instructor-led portion of the training. A good lesson learned for me regarding learner analysis.

-2- Flexible activity during instructor-led training
When a trainer is responsible for facilitating a class with several learners, finding time for one-on-one coaching can be challenging. However, if portions of that training work well as eLearning, then a trainer can keep a class independently productive by assigning eLearning lessons while also pulling aside learners for one-on-one time. While I’m sure there are situations where this might not work well, I’ve seen this approach be successful several times.

-3- Introductory instruction for on-the-job training (OJT)
A while back I was tasked with designing new employee training for a customer service department. It was a small call center with high turnover, which meant that they generally only hired one or two people at a time, but did so frequently. Before I came to the party, new employees were trained by spending seven hours a day observing and practicing with mentors on the job and spending one hour a day talking through the procedure manual with a supervisor. The company did not have dedicated trainers or structured instruction. After a week of training, supervisors crossed their fingers in hopes that new employees learned all they needed, and those employees were expected to perform independently on the phones. Performance metrics were low and attrition within the first three months of employment was high.

In the new training design, policies and procedures were introduced with eLearning lessons, which included knowledge checks and quizzes. OJT was structured to reinforce what was learned from the eLearning lessons each day. While training still lasted a week, early performance metrics improved dramatically and attrition decreased. Plus, supervisors found that the eLearning lessons were handy for remediation and refresher training.

What else?
These are blended examples I’ve personally worked with, but I know there are plenty of other ways to flexibly use eLearning in a blended approach. So now I pose my usual question: what are some other approaches you’ve designed?

Wednesday, August 11, 2010

Don’t Convert! Redesign Instructor-Led Training for eLearning

By Shelley A. Gable

Though eLearning isn’t new to the training field anymore, it’s still relatively new to many organizations. And once those organizations buy into the benefits of eLearning, many are tempted to run and dive into the deep end of the pool as quickly as possible. Sometimes even before taking a swimming lesson…or changing into a proper bathing suit.

The result?

Requests to convert existing instructor-led training (ILT) to eLearning.

For many organizations, this may be a step in the right direction. Just be sure to make informed decisions along the way.

Conduct an infrastructure and technology analysis.
Do learners have the technology needed to access eLearning? Does the organization have a system in place to administer and track eLearning (e.g., a learning management system)? Is the organization prepared to provide technical support for eLearning? Think of issues like this as the bathing suit. Just as you should have a bathing suit before heading to the pool (at least a public pool), organizations should probably have these issues figured out before diving into eLearning.

Employ a change management campaign.
If an organization has used little or no eLearning in the past and now wants to make it a significant component of its training strategy, it’s going to be an adjustment for learners. Employees who have little experience with eLearning may be skeptical that self-paced, computer-based training can effectively replace the human touch offered by a live facilitator. You’ll need to earn their buy-in. After all, if people believe they can’t learn something for whatever reason, they probably won’t.

If change management is new to you, the good news is that much has been written on the topic. A few books I like are Thriving Through Change by Elaine Biech, Managing Transitions by William Bridges, and ADKAR: A Model for Change in Business, Government and Our Community by Jeffrey M. Hiatt. All three books describe the stages of change management, explain why people respond to change the way they do, and offer actionable advice (with examples!) for successful change management.

Can change management be likened to making sure your bathing suit fits? Or maybe that’s stretching the analogy too far…

Start with a pilot.
Testing the waters with an eLearning pilot course offers many advantages. It can help you confirm that the organization is ready for eLearning from a technology and infrastructure perspective. It can help you gauge the success of your change management efforts. It can uncover unanticipated issues within a limited population so you’re better prepared for a full scale roll-out. And a successful pilot lends credibility to future efforts. For advice on planning an eLearning pilot, check out a previous post on this blog: Collecting Data from an eLearning Pilot.

Identify content that is most likely to succeed with eLearning.
Not all performance goals are optimal for eLearning. Some behaviors really are best learned through instructor-led or on-the-job training. With that in mind, recommend a blended approach when appropriate. For advice on determining when eLearning makes the most sense, check out a couple of previous posts on this blog: Will eLearning Work for You? and Pointing to the Five Moments of Learning Need.

Employ sound instructional design principles.
Sounds obvious, right? But once you jump into the work, it might become less obvious. I’ve seen talented instructional designers convert ILT into eLearning as though they’re doing a straight, simple conversion. In other words, lectures become text-heavy slides, while discussion questions and activities are translated into dull knowledge checks. Not that knowledge checks are inherently dull…but they usually are if you don’t put much thought into them.

Instead of approaching this task as a conversion, think of it as a redesign. View the existing ILT materials as a pile of content the organization has handed to you, and start your eLearning design from scratch, following the instructional design models you know and love. Think Gagne’s nine events of instruction, Merrill’s first principles, the ARCS model, and so on.

What else?
This certainly isn’t an exhaustive checklist for transitioning to eLearning, but it should help guide some of your first steps. What else do you consider? What challenges have you encountered with this type of request?

Tuesday, July 27, 2010

7 Techniques to Capture Attention in eLearning

By Shelley A. Gable

Regardless of the extent of your background in instructional design, I think just about everyone can agree that capturing learners’ attention at the start of an eLearning course (and engaging interest throughout) is critical. Anyone who has taken an introductory public speaking class can appreciate this principle.

In the spirit of sharing some basic ideas while keeping this simple, below are seven techniques designers can use to capture learners’ attention at the start of an eLearning course.

--1-- Present a problem: Employ a problem-centered approach to instruction by presenting learners with a problem that the training will help them solve (and then prompt them to incrementally solve pieces of the problem, leading up to a learner-built resolution).

--2-- Tell a story: A brief, well-told story can create a context for learners to learn new information and connect learners emotionally with the content (i.e., inspire them to care about what they’re learning). If you have a knack for incorporating humor, even better.

--3-- Create dissonance: Provoke curiosity in learners by presenting a surprising fact or prompting them to discover an unexpected gap in their existing knowledge that the course fills (perhaps by asking questions, presenting a scenario, or conducting a pre-test).

--4-- Share a thought-provoking quote: You can use quotes in many ways. One of the most common uses is to pose an insightful quote from someone well-known. If your training is in support of a change in the organization, it might be valuable to include quotes in support of the change from managers and/or executives (or satisfied pilot participants, if the change was piloted before implementation). Quality quotes from relatively unknown people can be inspirational too, such as a glowing customer review or testimonial of a product about to be trained.

--5-- Incorporate high-quality multimedia: Ever attend a session that started with a 60-second multimedia presentation, complete with intriguing images and upbeat music? While I’m not suggesting that you work this specific music into your training, there’s a reason that many presentations include Jock Jams in their introductory piece. It gets your adrenaline pumping. And a sharp, relevant, well-placed multimedia presentation can do wonders to impress and wake up your audience.

--6-- State expectations: Since training should result in specific on-the-job behaviors, inform learners of what will be expected of them after training (and how they’ll be held accountable). Learners should also be informed of how they’ll be held accountable for learning during training (e.g., assessments, development plan, online discussion, etc.). Of course, this element should be a part of every course.

--7-- Engage before the course: Contacting learners prior to a course can communicate its importance and help make learners feel connected to it. If it’s a blended course that incorporates instructor-led training, an email or phone call from the trainer adds a nice personal touch. The contact can be used to do a pre-course learner analysis or simply communicate expectations. For a course that’s purely eLearning, pre-course communication from the learners’ managers can have a similar effect, especially when it comes to reinforcing why the course is important. Referring to the pre-course communication at the start of a course can be a great way to grab the learner’s attention.

Of course, there are numerous ways to grab learners’ attention – so, what additional techniques do you use?

Thursday, July 22, 2010

Hiding your skin in Captivate 5

By Susan O'Connell

About a year ago, I posted instructions on using Captivate’s system variables to turn the Captivate skin on and off within your course. Now that Captivate 5 is available, I revisited this functionality and was pleased to find that the steps to do this in the new version have been streamlined. Here is an updated version of that previous post, starting with why you’d want to show or hide the skin in the first place.

Reason #1. Many designers include assessments within their Captivate lessons. During the informational and practice portions of the lesson, the students can use the navigation bar included with the Captivate skin to proceed through the lesson. However, when they reach the assessment, it's often desirable to disable navigation back to the course content so that the assessment is a true test of what the student can recall. Upon arriving on the scoring and results page, the navigation bar would be turned back on and the student would be able to review the lesson and retake the assessment if necessary.

Reason #2. This functionality is also helpful when you have a basic course flow with some periodic branching. The Captivate skin can be used to navigate the basic linear aspects of the course, and then the skin can be hidden for those branched elements.

Now that I've covered why we might want to access these system variables, without further ado, below are the steps I took to accomplish this.
  1. Select Project > Advanced Actions from the menu.
  2. In the Action Name field, type a new action name. Then, click the small “Add” icon above the Actions columns. When you click this icon, a dropdown will appear in the Actions column.
  3. Select the “Assign” action. This will bring up a “Select Variable” dropdown.
  4. Select the cpCmndShowPlaybar variable. A dropdown will display next to the variable allowing you to select either a “variable” or a “literal”value.
  5. Select “literal” and enter a 0 in the field. Your Action should now look like the one shown below.
  6. Click Save.
  7. Repeat the above steps to create another Advanced Action to turn the skin back on. The literal value will be “1.”
Now, here is how I used these actions within the Captivate lesson itself.
  1. If the slide “Properties” tab is not already displayed on the right of the slide, select Properties from the Window menu.
  2. On slides where you want the navigation bar hidden, expand the Action options and select “Execute Advanced Actions” in the On Enter field.
  3. In the Script field, select the script you just created to hide the skin.
  4. Select the slide(s) where you would like to turn the navigation bar back on and repeat steps 2 and 3, this time selecting the action to turn the navigation bar on.
  5. Test your results!
(TIP: In my own playing around and testing of this functionality, I tried associating a “ShowSkin” Advanced Action on the “On Exit” action of a slide and found that this did not turn the skin back on once it had been hidden. My ShowSkin action only worked when I set it as an “On Enter” action.)

Thursday, July 15, 2010

Anatomy of an eLearning Lesson: Merrill’s First Principles

By Shelley A. Gable

A post from a couple weeks ago explained that there are instructional design models that offer formulas for assembling training in a way that captures learners’ attention, conveys content, and provides learners with an opportunity to practice and receive feedback on new skills. That post described Robert Gagne’s nine events of instruction, which is one of the more popular instructional design models and is based on cognitive and behavioral psychology.

Another well-known and broadly accepted instructional design model is M. David Merrill’s first principles of instruction. Merrill built this model based on a comprehensive review of instructional theories and models in the field. The principles are a synthesis of his findings.

Both models provide sound structure for developing effective eLearning. This post mimics the earlier one about Gagne’s nine events of instruction by first defining the parts of Merrill’s model, and then applying it to a short eLearning lesson.

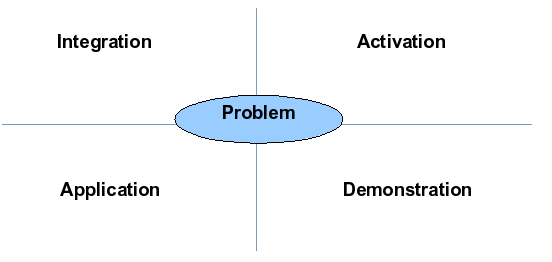
Merrill’s first principles consists of five principles, each with supporting corollaries.


Image from http://edutechwiki.unige.ch/mediawiki/images/9/9a/Merril-first-principles-of-instruction.png


Principle #1: Problem-Centered Learning – Engage learners in solving real-world problems.

  • Corollary #1: Show Task – Demonstrate the task learners are expected to perform after they complete training.

  • Corollary #2: Task Level – Engage learners in a problem, as opposed to isolated steps or actions only.

  • Corollary #3: Problem Progression – Present varied problems/scenarios, working from simple to complex.


Principle #2: Activation – Relate learning to previous knowledge and experience.

  • Corollary #1: Previous Experience – Direct learners to recall previous knowledge, so they can use that as a foundation for learning new knowledge.

  • Corollary #2: New Experience – Provide learners with new, relevant experience to use as a foundation for learning new knowledge.

  • Corollary #3: Structure – Organize new knowledge in a logical structure to help learners recall that knowledge later.


Principle #3: Demonstration – Demonstrate what learners must learn rather than simply telling them.

  • Corollary #1: Demonstration Consistency – Demonstrate tasks that are consistent with the learning goal.

  • Corollary #2: Learning Guidance – Reinforce the demonstration by providing learners with additional guidance, such as reference material and varied demonstrations.

  • Corollary #3: Relevant Media – Use multiple forms of media appropriately in training.


Principle #4: Application – Provide learners with practice activities during training.

  • Corollary #1: Practice Consistency – Design practice activities and assessments to be consistent with the learning objectives.

  • Corollary #2: Diminishing Coaching – Provide learners with feedback and gradually withdraw that feedback as they learn.

  • Corollary #3: Varied Problems – Provide learners with a variety of practice scenarios.


Principle #5: Integration – Prompt learners to apply newly learned knowledge to their jobs.

  • Corollary #1: Watch Me – Prompt learners to demonstrate their new knowledge.

  • Corollary #2: Reflection – Prompt learners to reflect upon and discuss their new knowledge.

  • Corollary #3: Creation – Direct learners to create and explore ways to use their new knowledge.


If you compare this model to Gagne’s nine events of instruction, you’ll notice that Merrill’s first principles include all of Gagne’s events, they’re just described a bit differently in some places.

Let’s look at an example of how Merrill’s first principles can be applied to a short eLearning lesson. We’ll look at the same sample lesson used in the earlier Gagne post. This lesson is part of a larger eLearning course designed to teach experienced support staff in a small lending firm how to conduct quality control checks on mortgage applications. The purpose of this particular lesson is to teach learners how to identify errors.

-1- Problem-Centered Learning
Prompt learners to guess the percent of mortgage applications that have errors (could set up as a multiple choice or free response question). After learners attempt to guess, reveal the alarming statistic. Then briefly explain to learners that they can dramatically decrease that number, and outline some of the positive impacts of catching errors. Throughout the lesson, present a variety of demonstrations and practice activities.

-2- Activation
Prompt learners to identify the types of application errors they’ve heard about (could set up as a multiple response question). Ask learners to recall the consequences of those errors (could set up as a free response or matching question). Throughout the lesson, present a variety of demonstrations and practice activities. Organize new knowledge according to the application they’re learning to audit.

-3- Demonstration
Guide learners through the application, and explain how each section should be completed. Provide multiple examples of correct entries and common mistakes. When appropriate, ask questions to prompt learners to anticipate these examples based on their experience. Include audio and visual media in the demonstration.

-4- Application
Present practice exercises in which learners identify errors (or the lack thereof) on sample applications. Start by providing immediate feedback to learners about the correctness of their responses, and scale back to offering hints as needed.

Practice exercises can be peppered throughout the presentation of content and learning guidance to break up the sections of the application. A final practice exercise could be handled as a game where the learner receives points for correct responses and is challenged to earn a certain number of points.

Include a formal assessment at the end where the learner audits a few applications with varying types of errors. Provide learners with feedback after submitting the assessment and offer remediation as needed.

-5- Integration
Point learners to a job aid they can use on the job, and tell them where they can go with questions. Ensure that learners begin auditing applications shortly after they complete the training. If possible, assign learners to coaches who can check their early work and discuss their performance with them.

So why present both models?
Both models point instructional designers in the same direction, and both are broadly used and accepted in the field. It’s helpful to be familiar with a few of the models available to guide you in eLearning design, so that you can choose to follow the one that resonates most with you…or even combine elements of various models to give yourself a more complete picture.

Which model do you think about when designing an eLearning lesson? Gagne’s? Merrill’s? Another one?

Thursday, June 24, 2010

Anatomy of an eLearning Lesson: Nine Events of Instruction

By Shelley A. Gable

You’re tasked with outlining an eLearning lesson. You’ve analyzed your content and audience, and you have a clear understanding of what learners need to be able to do by the end of the lesson.

But how do you avoid designing a lesson that’s little more than a basic info dump?

How do you truly engage learning?

A handful of instructional design models offer formulas for assembling training in a way that captures learners’ attention, conveys content, and provides learners with an opportunity to practice and receive feedback on new skills. One of the more popular models is Robert Gagne’s nine events of instruction.

Here are the events:
  1. Gain attention
    Spark learners’ interest and curiosity to motivate learning

  2. Inform learners of objectives
    State training objectives or goals to communicate expectations

  3. Stimulate recall
    Include questions or an activity to engage existing knowledge to which learners can relate new content

  4. Present content
    Present the new content learners must learn, preferably with a variety of media

  5. Provide learning guidance
    Elaborate on presented content by telling stories, explaining examples and non-examples, offering analogies, etc.

  6. Elicit performance (practice)
    Prompt learners to practice using newly learned skills and knowledge

  7. Provide feedback
    Provide immediate and specific feedback to learners while they practice, to help shape their behavior to improve performance

  8. Assess performance
    Test learners on newly learned skills and knowledge to confirm that they’ve met the originally stated training objectives or goals

  9. Enhance retention and transfer to the job
    Provide support to ensure learners apply newly learned knowledge and skills on the job (e.g., post-training follow-up plans, job aids, etc.)

Although you may encounter situations when it’s not practical to include all of these steps in training, and sometimes you might apply these steps in a different order, this formula provides the basic structure you need to begin designing training that goes beyond basic communication.

Let’s look at an example of how this formula can be applied to a short eLearning lesson. This lesson is part of a larger eLearning course designed to teach experienced support staff in a small lending firm how to conduct quality control checks on mortgage applications. The purpose of this particular lesson is to teach learners how to identify errors.

-1- Gain attention
Prompt learners to guess the percent of mortgage applications that have errors (could set up as a multiple choice or free response question). After learners attempt to guess, reveal the alarming statistic. Then briefly explain to learners that they can dramatically decrease that number, and outline some of the positive impacts of catching errors.

-2- Inform learners of objectives
State: After completing this lesson, you will be able to identify errors on Application 1487B.

Note that this is not the standard three-part objective (behavior, criterion, condition) that we should write when outlining the course. Although opinions on this vary, many believe that it is not necessary to present the entire objective to learners and that a simple purpose statement is sufficient.

-3- Stimulate recall
Prompt learners to identify the types of application errors they’ve heard about (could set up as a multiple response question). Ask learners to recall the consequences of those errors (could set up as a free response or matching question).

-4 & 5- Present content and provide learning guidance
Guide learners through the application, and explain how each section should be completed. Provide multiple examples of correct entries and common mistakes. When appropriate, ask questions to prompt learners to anticipate these examples based on their experience.

-6 & 7- Elicit performance (practice) and provide feedback
Present practice exercises in which learners identify errors (or the lack thereof) on sample applications. Provide immediate feedback to learners about the correctness of their responses, and provide hints as needed.

Practice exercises can be peppered throughout the presentation of content and learning guidance to break up the sections of the application. A final practice exercise could be handled as a game where the learner receives points for correct responses and is challenged to earn a certain number of points.

-8- Assess performance
Include a formal assessment at the end where the learner audits a few applications with varying types of errors. Provide learners with feedback after submitting the assessment and offer remediation as needed.

-9- Enhance retention and transfer to the job
Point learners to a job aid they can use on the job, and tell them where they can go with questions. Ensure that learners begin auditing applications shortly after they complete the training. If possible, assign learners to coaches who can check their early work and provide feedback.

In order to maximize training’s success, you must complement a model like this with instructional tactics that align with adult learning principles. Using this basic framework to begin designing an eLearning lesson can help ensure that you’ve included these critical components in your training.

Click here for another Anatomy of an eLearning Lesson: Merrill's First Principles.

Tuesday, June 22, 2010

Yes, your Captivate Sim can drive your Lectora Course

Autoadvance Lectora when the Learner finishes a Captivate Simulation


By Jay Lambert


Frequently, we embed Adobe Captivate simulations within a Lectora eLearning course. The two authoring tools actually work together really well.

But note that if you simply insert the Captivate simulation as a Flash swf file into Lectora without doing anything to limit the course navigation, then the learner can easily click right on through to the next page in the title. That's a bad thing if your simulation contains vital content (and if it doesn't, why is it there?). Since we typically use this technique for software training, if the learners skip out of the simulation, then they have missed the instruction.

Luckily you can use JavaScript to prevent this from happening.

Our most common scenario for including a Captivate simulation is as a demonstration. In that case, we just want to ensure that the learners finish watching the simulation. When they do, they're free to advance in the course.

To set this up is a 2-step process. You'll do one simple step in Captivate and the other in Lectora.

In Captivate


1. With your Captivate file open, go to the Edit menu and click Preferences.


2. Under the Project category, click Start and End.


3. Now locate the Project end options on the bottom right side of the Preferences box.

4. Click the Action drop-down and select Execute JavaScript.

5. Then click the three dots to enable the JavaScript entry box and type trivNextPage().


6. Click OK and Save the file. Now after you've published and inserted the file into your Lectora course, the Captivate sim will instruct Lectora to go to the next page when the learner reaches the end of the sim.

You could use this same approach for a guided practice.

Note that if your course includes a Captivate test, then you can also have Captivate set a variable upon the test being passed. And then Lectora could read the variable. Once you start using Captivate to set JavaScript, there are quite a few possibilities.

In Lectora


Once you've inserted the Captivate swf file into your Lectora title, disable the forward navigation for that page. Publish the course and launch the resulting HTML pages. When the learner takes the course, it will automatically advance at the end of the simulation, but not before.

That's all there is to it.

Note: The JavaScript command will not work in Lectora's preview mode. You must publish the course.

Tuesday, June 15, 2010

Amazon would make a good Instructional Designer

By Jay Lambert

As you likely know, Amazon's software is amazing. Whenever I sign on to the site (which is fairly often), they suggest a variety of things for me to purchase that are typically right on target. I see books on instructional design and eLearning, books and music that my kids will like, travel guides for my wife, the list goes on and on. And I also get emails from them every week advertising new arrivals--things that I absolutely must have. (That's why Visa knows me well, too; but that's another story.)

In other words, Amazon knows me and knows me pretty well. And it's not just me; they know their audience. No wonder they're so successful.

Amazon's approach fits really well with instructional design. Don't just trot out your content and go home. Get to know your audience.
  • Observe the training audience in action
  • Do some surveying and analysis
  • Tailor your learning delivery to a format that will engage them
  • Offer up what they feel they will need to bring about your learning objective successfully.

Knowing your audience impacts so many pieces of a learning initiative--the content itself, the format, the delivery mechanism, what might grab the learners' attention and what might not.

Does your audience need to know the content inside and out? Or do they need to know where to find it if they need it? (For more on this, see Pointing to the Five Moments of Learning Need.)

Does your audience have time for training? Company culture is an important consideration. For example, one of our clients has a very mobile and busy workforce; they respond best to short, very targeted modules, typically 10 minutes or less (learning theory says most do). Another client gets only a set amount of training time each quarter, so they opt for a much more immersive experience to gain the most they can out of each session.

Will your audience access the eLearning course from a desktop, a laptop, a mobile device, or maybe something else? What are the capabilities of their device? Be mindful of building eLearning that your target will be able to view. Not doing this would pretty much defeat the purpose right out of the gate.

And also be aware of the difference between attention getting and potentially objectionable. Amazon never pitches certain things to me and I appreciate them for it. How does this relate to instructional design (besides avoiding certain shock tactics)? The answer to this might sometimes surprise you. A friend of mine recently designed a somewhat cutting edge course with avatars, scenario-based learning, videos, and more--exactly what many companies wish for. And yet his audience, Baby Boomer engineers, hated it. In a post evaluation, they invariably asked for a less engaging, more straight-forward delivery, so that they could get back to work faster. Not what he expected at all. His audience was so irritated by the avatars that they missed the point of the content.

As you design your next course, think of Amazon. What clues of behavior have you observed or been told that will help you target the experience for your learners?

Be an Amazon, not a Webvan (which by the way, seems to be a part of Amazon these days).

Wednesday, June 9, 2010

Collecting Data from an eLearning Pilot

By Shelley A. Gable

At last! After weeks – perhaps months – of analysis, design, and development, you finally have a completed and fully functional eLearning course. Finishing that last step to completion is a proud moment. And a relief.

So now what? Roll it out to the masses!

No, wait.

Before rolling it out to the masses (assuming that’s your eventual intent), you should probably pilot the course with a small group of learners from your target audience. Run your pilot for a predetermined amount of time, collect some data to identify what worked about the course and what didn’t, and make some adjustments. Then, you might be ready for a full rollout. Or perhaps another pilot.

So now that we’ve decided to run a pilot, what’s the next step? At this point, many people are tempted to identify pilot participants and start drafting survey questions. But there’s a more systematic way to plan your evaluation.

First, identify the questions your pilot needs to answer.

If you’ve already started writing survey questions, set that draft aside for a moment. Forget surveys. Forget interviews. Just think about questions. What questions should your pilot evaluation effort answer about your eLearning course?

Your best bet is to work with your project team to identify these questions. And you’ll probably find it helpful to refer to evaluation models for guidance, such Kirkpatrick’s four level evaluation model.

Examples of questions might include:
  • Was the eLearning course and its activities easy to use?
  • Which topics or tasks did learners struggle with?
  • Did learners perform as expected on the job?


Of course, these are very general questions. There may be questions worth asking that are specific to your course. For instance, if you experimented with a branching type of scenario, you might ask a question about the effectiveness and/or appeal of that activity, specifically.

Next, identify who can answer your questions.

If you pulled out that survey draft, put it away again. At this point, we need to identify which stakeholders can answer the questions identified for the pilot.

Which answers must come directly from the learners? If the course has a blend of eLearning and instructor-led training, perhaps there are certain questions that trainers can help answer. Maybe there are questions that the learners’ supervisors should answer. Or maybe there are performance reports you should obtain.

Now, select data collection methods.

This is the step that many people mistakenly jump to first. Until you know what questions you’re asking and who can answer what, you’re really not in a position to make informed decisions here.

After all, the nature of the data you collect should be a primary driver of how you collect it. For instance, if your organization already has a reliable survey tool for collecting learner satisfaction for a course, it might make sense to use that survey. If you want to collect specific examples and stories from learners about their successes or lack thereof, your best bet might be an interview or focus group. If you need to measure on-the-job behavior, you might opt for observation. Naturally, many evaluation efforts employ multiple data collection methods.

Another driver of data collection methodology is resources. How much time do you have to conduct the evaluation? And what is the availability of your pilot participants? If your turnaround time is short, you might not have time to conduct several one-on-one interviews. If your audience is geographically disbursed, observation might not be practical.

When (and how often) should you collect the data?

Suppose you’re evaluating a two-week blended pilot course, and you intend to survey learners to measure their perceptions of the training. You’ll need to decide whether you’ll measure just once at the end, or whether you should collect data at earlier points as well. If you’re collecting on-the-job performance data, you’ll need to identify the appropriate times to collect data based on the tasks you’re measuring.

What else?

While this should be enough to get the gears turning, naturally, there are several other factors to consider, too. For example:
  • Who (and how many) should participate in the pilot?
  • How do you plan to analyze pilot data?
  • How and to whom should you communicate the results of the pilot?
  • What are the potential risks and mitigating steps for the pilot?


If you’ve evaluated an eLearning pilot, please share your tips and lessons learned in the comments. Or if you have questions or suggestions for future posts related to evaluation, please share those thoughts as well!

Tuesday, June 1, 2010

Incorporating the Learner’s Name into your Lectora Course

Unlocking the Power of Lectora Variables, Part 2


By Jay Lambert

In an earlier post on this blog, we walked through using a Lectora variable to control page navigation in your eLearning course. In this post, we'll look at using the learner’s name in your course content.

Including the learner’s name in your Lectora course can take many forms, such as 'Welcome to computer skills training, John.'

If your eLearning course is set as AICC or SCORM (under Title Properties/Content), Lectora automatically adds a set of tracking variables to your course so half your work is done for you.


In this case, the name variable is AICC_Student_Name. When a learner opens your course from within a learning management system (LMS), the course will be able to get the learner’s name from this AICC_Student_Name variable.


If you’re not using an LMS to host the course, you’ll need to add a form or Entry Box into your title where the learner can enter his or her name. You’ll then be able to manipulate the name they entered (let’s hope it’s the right one) and incorporate it into your course content as well. (As a best practice, rename the variable name to something that you’ll be able to find easily later. Lectora automatically assigns sequential numbers to new variable names; for example, the variable shown below was originally Entry_0002, but I renamed it Entry_StudentName to better reflect what it is – a text entry box holding the student name.)


Let’s assume you have the AICC_Student_Name variable.

Add a text box to the page where you want to display the learner’s name. Name your text box something that you’ll be able to find easily such as ‘StudentName’.


There shouldn’t be any additional text in the text box beyond what you need to figure out where to place it on the page; it’s just a placeholder and whatever is originally in there will be overwritten.


Add an action to the Page itself. The Action would be On Show (meaning when the page is first displayed), Change Contents. The Target would be the ‘StudentName’ text box. And the New Contents would be the AICC_Student_Name.


Now when the page displays, it will automatically get the learner’s name from the LMS and put it in the text box on the page.


If you aren’t using the AICC_Student_Name variable, but rather one you created with an Entry Box, then use that variable name instead.

You can do similar tricks to display anything you’ve previously captured in a variable – something else about the learner, a piece of text you had them enter on a previous screen, etc.

In a future post, we’ll look at other things you can do with Lectora variables to spruce up your eLearning.

Thursday, May 27, 2010

Sizing Up an eLearning Lesson

By Shelley A. Gable

If you’re designing a one-week course, or even a partial day course, how do you divide its content into lessons?

Intuitively, I used to define lessons by topic. Some lessons I’ve designed are as short as 15 minutes, while others are up to four hours. The topic would drive the length. Conversely, an instructional designer I used to work with felt strongly that a lesson should be an hour, and he would look for ways to logically organize content into one-hour chunks.

Why does lesson size matter?

The length of eLearning lessons matters for at least two reasons:

-1- Learner Perception

Lessons clearly chunk content within a course, which can help learners keep the information organized in their minds.

Lessons also create natural breaks, which might encourage learners to take breaks at key points throughout a course. Although the nature of eLearning usually allows learners to set their own pace and take breaks whenever they want, many opt to wait for clear stopping points (i.e., the end of a lesson).

Appropriately sized lessons can also help create a sense of progress for learners. A single, four-hour eLearning lesson may feel like it’s never going to end. This can cause learners to feel antsy, lose focus, and start clicking through the content too quickly. In contrast, several 30-minute lessons can make a course feel less massive and overwhelming.

-2- Reusability

If you need to develop training for several audiences with similar but different needs, you may find it helpful to design lessons in a way that makes them reusable in multiple courses. Smaller lessons with a more limited content focus can be helpful in this case.

For example, consider this scenario:

You’re designing new employee training for a telecommunication company’s customer service function. The function has several departments, each servicing a different product line (e.g., landlines, cell service, internet, consumer, commercial, etc.), and each department works with a different computer system. Although the various departments perform similar types of tasks, each department follows a different procedure for a given task.

At a glance, it might seem like each department needs its own unique training program. However, with detailed analysis of the content to be trained, you might find that some lessons can be shared across multiple audiences if the content is chunked just right. This might mean designing lessons that address a single performance objective.

For example, if a customer calls to cancel an account, most companies want employees to determine the cancellation reason and attempt to keep that customer’s business. If this conversation is handled similarly by the various departments in our fictional company, then the soft skills related to this task might be taught in one set of lessons that are shared across the departments, while system procedures related to the task might be taught in another set of lessons that are specific to each department. The shared lessons result in fewer training materials that must be developed, stored, and maintained.

What are your best practices for dividing course content into lessons?

Do you aim for a certain lesson length? Do you divide it by topic? By tasks? Do you optimize for reusability? Or do you follow a completely different train of thought?

Monday, May 24, 2010

Six Principles for Sticky Ideas that You Should Know

By Derek Howard

Great ideas are golden. This is especially true in the business world. A great idea can save money, rake in new business and ultimately really plump the bottom-line. Big or small, a great idea is a great idea. Unfortunately, sometimes, no matter how great the idea is, it just never seems to catch on. Why is this?

The good news is that it’s rarely the fault of the idea itself. The problem usually lies with the communication and/or instructional design: how the idea is presented (or with the environment, but that's another story). If an idea never manages to reach and grab hold of its listeners, then its brilliance becomes beside the point. Look at it this way; if great ideas are the currency that drive a business, then you’d better make sure it’s one your intended audience uses. This is true whether you are pitching marketing ideas or introducing new concepts in a training program. As we know from instructional design, the exchange process becomes almost as important as the message itself.

So the question becomes how do you go about making an idea more effective and less likely to fade? Part of this is knowing your audience. That’s easier in the training world than in marketing (such as random visitors to your website); but whatever your purpose, there are techniques to improve your chances of staying on people’s minds.

Two experts in this field are Chip and Dan Heath. In their book Made to Stick, the Heath brothers discuss and dissect what makes an idea stick (see an earlier post on this blog, Does Your eLearning Stick?, for a quick look at how the book relates to learning theory.) In fact, the term “stickiness” defines this work. As they put it, an idea that is sticky is one that is easy to grasp, memorable and stands a good chance of changing people’s minds. That’s definitely a good learning or marketing outcome.

Though the book is filled with tons of great advice and ideas, there are six key principles that the Heath brothers suggest to make any idea sticky: simple, unexpected, concrete, credible, emotional and stories- what they refer to as the SUCCESs.

Simple means just that- your idea should be explained in the most simple and straight-forward manner. The brothers advise everyone to first find the core idea of your message and build your training program or presentation around it. Sharing this core idea can be tricky. You want to reduce your idea to its base form without turning it into some trite phrase devoid of any real meaning. One suggestion they give is to use existing designs and ideas to compare/promote your own. Being able to say something is “like” something that an audience may already be familiar with can really help them grasp the concept.

Unexpected is getting your audience’s attention through surprise and interest. As the Heath brothers suggest, things that stand out as different or unique tend hold our attention and stick around in our head a lot longer. If you can break people out of their normal pattern of thinking, you can cause them to pause and hear your message.

Concrete represents making sure people not only understand your idea but remember it as well. This can be especially important when your ideas are being shared between different groups of people; the Heath brothers give the example of engineers vs. manufacturers. Know your audience. The more solid your idea is seen by your audience, the better they are able to hang onto and use it.

Credible is the principle that helps people believe. In order for people to accept an idea, they have to have faith in the source. The Heath brothers break down credibility into two sources: internal and external. Internal is the message itself - the data, which should always be made accessible to your audience (simple and understandable, not dense and convoluted). External authorities are either experts or celebrities that will promote and lend weight to your idea.

Emotional is the concept of making people care about your idea. People have a tendency to think with their hearts and guts more than their heads. It won’t matter how great an idea you have if you can’t get people to have an emotional attachment. The brothers recommend such techniques as appealing to your audience’s self-interest and sense of self to create this connection. This is the "what's in it for me?"

Stories are what make people act. Stories involving your idea can act as a catalyst to get your ideas into action. We’re all suckers for a good story. A well placed and thought-out narrative can act to both inspire people and show your audience how to follow the suggested course of action your idea represents.

Great ideas are valuable to everyone; they're at the center of our training program or presentation. However, sometimes they need a little help to be easy to grasp, memorable and stand a good chance of changing people’s minds. Made to Stick is an excellent resource for those looking for just such help. I highly recommend giving it a look. The ideas in this book are sure to stick with you.