Monday, December 28, 2009

Will eLearning Work For You?

By Shelley A. Gable

Many organizations are converting pieces of their classroom training into eLearning modules. While there are a lot of advantages to eLearning - reduced delivery costs, on-demand availability regardless of time and location, consistent delivery, etc. - this delivery method might not be optimal for all of your training needs.

I've worked on a couple of projects over the past year that have involved analyzing the training needs of a particular business unit and determining which can be met with eLearning solutions. For those of you who may be working through a similar process, below are a few of the factors we considered when making this determination.

  • Is the content procedural and/or straight-forward? eLearning can be an efficient delivery method for content that is fairly black-and-white and tends to generate few clarifying questions from learners.

    If the content is complex, must be applied differently to various situations, or tends to generate a lot of clarifying questions, eLearning alone might not be the best delivery method. However, it might make sense to introduce the content's basic concepts with an eLearning lesson, and then address more advanced topics in an instructor-led environment.

    For example, a course on technical writing might benefit from this blended approach. An eLearning lesson could introduce the basic mechanics of writing style and formatting, while a facilitator-led method might be more appropriate for eliciting performance and providing detailed feedback.
  • Does the content involve interpersonal skills? Interpersonal skills (such as handling customer complaints, interviewing, public speaking, etc.) can rarely be fully developed in an eLearning environment. But as described above, a blended approach can allow an eLearning lesson to introduce a topic's basic principles, followed by a facilitator-led environment that fosters the application of those principles.
  • Where is your audience and when are they available for training? eLearning might be an ideal delivery method for audiences that are geographically dispersed or have schedules that are challenging to sync (perhaps because of time zone differences or job demands).

    For example, a customer care unit with agents who work from home might be a prime candidate for eLearning. Not only does the virtual access to training avoid travel time and expense, but also the on-demand nature of eLearning reduces the need to pull several agents off the phones at the same time to attend training.

I should point out that the organization this work was done for had the resources necessary to support eLearning. If your organization is wandering into this arena for the first time, there are basic logistical questions you should probably consider early on in the process. For instance:
  • Are your learners technologically equipped to access eLearning (i.e., Flash, multimedia, etc.)? If not, there are less complex eLearning options available, but this is important to determine early.
  • How will learners access the training (via an intranet site, a learning or content management system, etc.)?
  • How will you accurately track who has completed the training (via a learning or content management system, printed completion certificates, automatic emails to managers, etc.)?
  • Who will respond to technical issues that arise (internal technical developers, IT, external consultants, etc.)?


Obviously, neither of these question lists are exhaustive. However, if your organization is considering a transition to eLearning, hopefully these lists will be helpful to you in your decision-making process.

And remember, there are no 'stupid' questions. It's better to ask now and be confident later. Then you will know that eLearning will work for you, and the fun can begin.

Monday, December 21, 2009

3 Benefits to Using YouTube in your E-Learning

YouTube is like a box of chocolates, you never know what you are going to get. Well, maybe that's not a good description of YouTube. It's more like the wild west of video. You have to be careful where you go and sometimes you find something completely unexpected.

However, with the right set of instructions and proper organization, YouTube can be a great environment for learning. Content authors can take advantage of many of YouTube's features to easily upload video content, organize it, and distribute it. Of course, not all content may be suitable for public display so you will want to consider the privacy needs of your content before doing so.

Let's look at three benefits to using YouTube as an e-learning distribution tool.

1) YouTube takes your training to the Web

Of course when you post a video to YouTube it is on the web. But it doesn't have to be found only at YouTube's web site. You can integrate it into your own web site or into your web based training. You do this by using YouTube's embed feature and basically cut and paste the video into your HTML code. For example, if you are using the authoring tool Lectora, you can grab the embedding code from YouTube and paste it into an external HTML object.


Learn more at http://www.youtube.com/youtubeonyoursite.

2) YouTube takes your training Mobile

When you upload content to YouTube it becomes available on the YouTube network. This means that mobile apps can play it. Smart phones are more common place than ever and if your learners have access to iPhones, Android phones, or Blackberries they will be able to play your content on the go.


Learn more at http://www.youtube.com/mobile.

3) YouTube takes your training to the Living Room

Wasn't there an Internet TV coming a few years ago. Whatever happened to that? Well, it is finally starting to emerge now. There are many services you can use to stream YouTube directly to your TV using a DVD player, video game system, or other home entertainment device. For example you can use the Nintendo Wii's web browser to bring YouTube to your TV. Also, there is a service called PlayOn you can easily install on a PC to wirelessly stream YouTube (among many other Internet video providers) to a variety of devices including the Wii, PlayStation 3 and Xbox 360. Streaming Internet videos to the home television will be common place within the next year or so as more and more devices are shipping with Internet streaming services pre-installed.


Learn more at http://www.youtube.com/youtubeonyourtv.

Wednesday, December 9, 2009

Low-Tech Ways to Add Social and Collaborative Learning To Your Training Plans

By Shelley A. Gable

I think we've all heard the buzz about social and collaborative learning. Based on their research, Bersin & Associates suggests that "modern" corporate training organizations are transitioning to collaborative, talent-driven learning. A survey conducted by The MASIE Center earlier this year indicates a similar trend. Many blog posts have contemplated how Web 2.0 technologies can enhance workplace learning. In fact, a post on this blog a few months ago (Understanding Web 2.0) offers an informative crash course on the topic.

All this chatter prompts me to think about constructivism. Constructivist theory posits that people construct knowledge by making sense of their experiences. The theory also acknowledges the important role that social interaction plays in this. And really, it's these concepts that are at the core of this trend. The technologies of Web 2.0 provide us with ways to reach out to others, discuss what's on our mind, and ultimately attempt to make sense of the world around us.

If you're like the majority of organizations who responded to The MASIE Center survey, you may be intrigued by what Web 2.0 can offer, but not in a position just yet to take full advantage of it. If this is the case, consider how some of the low-tech collaborative learning options below might work for your organization.

  1. Provide a discussion forum for learners to post their insights from training. A simple discussion board can easily be set up on a Microsoft SharePoint site or on other types of intranet sites. Consider directing learners to post "ah ha" learnings, plans for applying what they've just learned, and/or unanswered questions from training. Asking learners to post their thoughts at key points during training not only prompts reflection, but also allows them to learn from others' insights. Requiring learners to use the discussion forum multiple times during the training and/or at suggested intervals after the training can help deepen the dialogue and enhance its interactivity.

  2. Assign learners to a partner or group to discuss the training via email. This medium can be used in a way similar to the discussion forum described above.

  3. Design a structured conversation for the learner to have with a manager about the training. In order for the lessons learned from training to transfer to the job, they must be reinforced by the learners' managers. Providing structure for a learner to discuss the training with a manager can be an effective way to encourage this. Such a conversation could take place at a specified point during or after the training, and it could aim to accomplish the type of reflection described in #1 above.

If you're among those who are interested in dabbling in collaborative learning, consider easing into it with one of these low-tech approaches. And if you do, be sure to use Web 2.0 (blog comments, Twitter, whatever your tool of choice) to tell the rest of us how it worked out.

Saturday, December 5, 2009

ADDIE should have been DADDIE all along

By Jay Lambert

Being in the realm of performance improvement, we are always searching for ways to improve our own processes. So it was an “aha” moment when I read Gerry Wasiluk’s post about the DADDIE model on the Articulate Forum. Basically, his former group borrowed from Six Sigma and added the ‘Define’ step to the beginning of the learning industry-standard ADDIE model. (As a reminder, ADDIE stands for Analyze, Design, Develop, Implement, and Evaluate.)

What constitutes Define? Things we are all already doing anyway really. Tasks such as creating a team charter, gaining a high-level understanding of the issue being addressed, creating a project plan, kicking off the project, etc. Define encompasses the logical first steps of a project.

Yet, I truly like the D being called out because these first steps are so critical to later success. I can think of times where we moved too quickly into a fast-paced project only to hit major bumps. The root cause? We had skipped over a key Define task and all of our ducks, so to speak, were not in a row.

By switching to the DADDIE model, the risk of this becomes much less likely. Charter documents and such are no longer an item to complete before starting a project, they are a called out and integral part of the project. Adjusting the model emphasizes their importance.

Give me a D all the way. Truly, ADDIE should have been DADDIE all along.

Saturday, November 28, 2009

4 Tips to help your training feel "Alive"

by Jonathan Shoaf

I'm sure you've seen the advertisements for the new Motorola Droid phones. The makers of the phone have gone through a lot of effort to make the phone appear alive and intelligent. One of the things they do is place a pulsating eye on the phone on start up with a voice that says "Droid". The phone gives you feedback everytime you receive a text message or e-mail. When you click on an icon to start an app, the icon's background is highlighted to let you know it received your touch. When you click on the buttons at the bottom of the phone, there is a slight vibration that does the same.

So how do you make something appear alive? If you research characteristics of living things you find a variety of answers that all roughly explain the same attributes like reproduction, growth, energy usage, and being responsive to the environment. This post will focus on how you can make your training feel more alive by making the training environment more responsive to the learner.

Of course, well designed training will always trump usability. Never the less, usability is extremely important and there are things that can be done to make your learners feel more comfortable with your content. My mantra has always been "less is more" and most of the time that has been a very effective strategy when it comes to usability. Be judicial as you use these tips to improve the experience your learner has with your content.

Problem
The training environment still feels flat, too mechanical, or dead

Solution
Breath some life into your training environment with these tips

#1 - Respond to learner actions

When the learner hovers over a button, bring it to life. This may be a simple color change or underline. You can do this with style sheets or Javascript. Even better, have a glowing button that pulsates into a warm glow as the user hovers over it. You will need Flash for that. The same applies for all interactive elements in the training content. Do things to let the learner know that the training is listening and anticipating their next action.

#2 - Use transitions consistently and effectively

Transitions can make your content feel alive and responsive instead of just another slide in a predestined slideshow. I use the fade in or fade out transitions a lot. Fly ins are also a common transition that can be visually appealing. Many popular authoring tools like Lectora and Captivate provide good transitioning options. One caveat, remember that when implemented poorly, transitions can be more distracting than helpful.

#3 - Reward exploration

What does that image in the upper right corner mean? What happens if I hover over it? Put in content that rewards your learners for being curious and encourages them to discover everything on the page. Use hover and click events to revel bonus learning material that may not be necessary for the course objectives but is a nice enrichment of the material. Learners that want to go beyond the existing material will have the opportunity through exploration of content on the page. These learners will become your biggest evangelists as they learn to appreciate the enrichment opportunities "hidden" in the content.

#4 - Feedback, feedback, feedback

Always give your user feedback. This includes feedback on where they are in the content, feedback on the completion status of sections, corrective feedback when they have not fully completed an activity or a section, and for goodness sake, remedial feedback when they miss a question or perform incorrectly in a simulation. E-Learning without feedback is truly in the non-living category!

Friday, November 27, 2009

Do Your eLearning Lessons Appeal to a Variety of Learning Styles?

By Shelley A. Gable

I took a course on learning styles a few years ago. The instructor pointed out that training practitioners tend to design instruction that caters to their own dominant learning styles. Although this may be the most comfortable approach for the one designing the training, it may result in some learners being left behind.

The point? Avoid the pitfall of designing to your own preferences - make sure you've incorporated instructional methods that appeal to a wide variety of learning styles.

Learning styles have to do with how people perceive and process new information. Since everyone's brains are wired differently (which explains the great variety of personality types among those we know), training must appeal to a variety of learning styles in order to be effective for varied audiences.

While writing this post, I opted to google "learning styles," and the first result on the list took me to a page that describes sensory modalities (i.e., visual, auditory, kinesthetic). Much research has been conducted about the role of those modalities in learning, and this seems to be one of the most widely familiar learning style models among training practitioners. In the table below, I've defined each of the modalities and suggested how each can be incorporated into an eLearning lesson.

Learning Modality + Definition

Use in eLearning

Visual = learning by observation and seeing information

Text, informative images, video demonstrations

Auditory = learning by listening to information or saying information aloud

Audio, discussion assignment in which the learner is required to discuss information with a manager or peer

Kinesthetic = learning by engaging in hands-on activities

Simulations, on-the-job task assignments

 
While the role of modalities in learning is important to consider, other learning style models can offer additional insights. A model that I'm partial to is the one developed by Anthony Gregorc, which explains how people perceive and organize information.

  • When it comes to perception, styles are categorized as either concrete or abstract. Someone with a concrete style relies most on physical senses for perceiving the world, while an abstract style tends to perceive through the less tangible means of emotion and intuition.
  • For organization, the categories are sequential and random. Those who are sequential tend to organize information in a linear way, whereas a random individual tends to organize information in a way that may appear to jump around more.

In Gregorc's model, a learning style consists of a perception-organization combination. Examining the characteristics of these styles not only helps you to better understand the varying ways in which people learn, but it can also aid in brainstorming instructional elements that cater to a variety of style types. In the table below, I've listed some of the characteristics of each combination and suggested instructional elements that can be used to appeal to each in an eLearning lesson.

Style Type + Characterization

Appealing eLearning Elements

Concrete Sequential = naturally structured, detail-oriented, precise, perfectionist tendencies

Simulations, clear step-by-step instructions, concrete examples

Abstract Sequential = logical, scientific, intellectual, curious

Links to additional “nice to know” information, quotes/examples from experts or positions of authority, open-ended questions

Abstract Random = relationship-oriented, subjective, imaginative, conceptual

Branching (i.e., allow learners to choose their own path through the eLearning lesson), social media, humor

Concrete Random = intuitive, impulsive, optimistic, innovative

Branching, problem-solving exercises, non-linear simulations

 
Admittedly, the summary provided here of Gregorc's model is oversimplified. However, it should give you a sense of the type of insight it provides into how people learn differently from one another.

What's the point of all this? To ensure that an eLearning lesson appeals to a broad audience, avoid the pitfall of designing to your own preferences - make sure you've incorporated instructional methods that appeal to a wide variety of learning styles.

Tuesday, November 17, 2009

What Are You Doing to Motivate Learning?

by Shelley A. Gable

We all know that attitudes toward training vary greatly in the workplace. Some people seize every professional development opportunity possible and are always eager to learn something new. Many are less enthusiastic.

Why are some people less enthusiastic? The reasons are numerous...and even those of us who work in the training field have probably felt less than enthusiastic about some training we've had to complete (I know I have!). Common gripes I've heard include:
  • Disinterest in the topic
  • Boredom with the presentation
  • Feeling that the training isn't as important as the work they should be doing during that time
  • Not seeing how the training will help them in their job

Of course, we also know that if people don't feel confident in their ability to master the training content, a common reaction is to be resistant to the training.

Clearly, we should do something to overcome these gripes and motivate people to learn. But how do you motivate people to learn? John Keller answers this question in several articles he has written about his ARCS model. ARCS is an acronym that represents four components of motivation in training: attention, relevance, confidence, and satisfaction. Each of these components is briefly defined below.
  • Attention: Capturing and maintaining learners' curiosity and interest
  • Relevance: Meeting learners' individual needs and goals
  • Confidence: Helping learners feel that they can be successful
  • Satisfaction: Reinforcing learners' accomplishments

So now what? How can these motivators be designed into an eLearning module? Fortunately, some of these things are simple touches that can easily be worked into the training. Below are a few techniques I've seen in my organization. You can click on the table below to enlarge it.


After I've storyboarded an eLearning module, I'll often go back through to identify places where I could work in something motivational. Considering how effective these basic motivational tactics can be, the extra step seems to be time well spent.

Monday, November 9, 2009

Add a Touch of Style to Lectora

Most web developers use CSS to specify how they want each web page element to look on their web site. They can control things like text color, font, margins, and all sorts of other attributes of elements. For example they may want all paragraphs to have a 10 pixel margin. This is done using CSS.

Hyperlinks by default are underlined and blue. While this is a standard and is universally recognized, there are times in which blue underline does not look appropriate in your project. Using CSS you can change this. If you are familiar with CSS you'll know to include a style sheet in your web page or use the <style> element in the header of your page. So how do you do this in your e-learning using Lectora?

Let's take a look.

Prerequisites
  • Ability to use Lectora to add images and create hyperlinks

To do this, you need to understand the power behind the external HTML object in Lectora. This object allows you to do many, many things if you know HTML, CSS, and JavaScript. You use this object to add HTML such as an embedded video or other object (links to my google calendar), and yes, you use it to add style to your project.

I've set up a page with a top navigation bar that contains three links to the home page, the help page, and to exit the project. After adding the hyperlinks, I removed the underline and changed the text color to white. Now you are ready to add the CSS to show an underline when the user hovers over the links.


1. Add an External HTML object to the page.

2. Give it an object type of Meta tags. This will place the CSS code in the header of the underlying HTML page.


3. Add the following CSS code in the Custom HTML field:

<style type="text/css">

a:hover {
  text-decoration: underline;
  color: white;
}

</style>

That's it. Now when you preview the project in HTML, you'll see the underlines appear when you hover over the hyperlinks.


You may find yourself wanting to do something more advanced on the hover event. For example, you may want to show a pop-up message. This is possible in Lectora using JavaScript. I'll save that topic for another day.

Thursday, October 8, 2009

Is Social Media Making You Think

I'm developing self-paced training for my organization. My background is in web development so I'm well versed in HTML, JavaScript, Flash, and all those types of things that make e-learning go bump in the night. That combined with my experience in academic technology and instructional design make me feel well qualified to be in the e-learning business. However, the future of e-learning may require additional tools in my toolbox.

There is a train moving very fast called social media that I am working very hard to master. It is having a transforming effect on the way we learn and use the web in general. Take a look at the following video from the Socialnomics - Social Media Blog.


This video "found me" through the LinkedIn social network. There are many videos similar to this out there on YouTube. While a video like this can be a little overly dramatic trying to sell social media, it does give you some things to think about. For example, people thrive off using social interaction to learn and make important decisions. This is both in there personal life and career.

A lesson I thought was particularly interesting from this video is that a 2009 US Department of Education study reveals that students studying online often outperform their face-to-face peers. Is this surprising to you? Probably not. Would it be surprising to your clients? Probably yes.

Online training is constantly changing and some would say changing dramatically in the last couple of years. A shift that makes it possible to harvest more power from social and informal networks. New development technologies make it easier to engage students. Online collaborative environments allow learners to work together (often making it easier to collaborate than being in the classroom itself).

Educators need to wake up and realize the value of social media for learning and look for ways to use it to engage students. I know that's what I'm thinking about. I'm creating self-paced courses but thinking about how the content could be distributed through social media. In the back of my mind, I'm breaking down the content into nuggets and exploring how that content can best find the learners who need it.

Sure, there are dangers in the security issues and misinformation social media brings. But, many enabling technologies bring challenges and this challenge will pass. The door will continue to swing open for more e-learning stategies to include a social aspect. With this in mind, what are you putting in your toolbox?

Saturday, September 19, 2009

It's not Voodoo, It's JavaScript

In my last post I showed you how to use the math functionality of Lectora. Lectora allows you to add, subtract, multiply, and divide variables. If you want to do more than this or use more complex logic, then you will need to add JavaScript to your project. For those unfamiliar with JavaScript, I might just as well have said you can hire an expert in voodoo to apply magic to your Lectora project. However, learning to use it will allow you to do more with your e-learning projects.

In this post I will show you how to use JavaScript to verify that a variable contains a valid number. Let's get started.

Prerequisites

1. Create a variable that will contain an answer to the question "Is this a number?"

The JavaScript code will use this variable to store its result.
  • Open up the Variable Manager from the Tools menu
  • Add a variable named "IsNumber" using the default settings
2. Add the JavaScript
  • Use the menu Add > Object > External HTML to add a place to put the JavaScript code.
    • Object Name: js_validateNumber
    • Object Type: Header Scripting
    • Custom HTML: Cut and Paste the following code into this text box:
function validateNumber() {
  if (VarYears.getValue().match(/[^0-9]/)) {
    VarIsNumber.set("no");
  } else {
    VarIsNumber.set("yes");
  }
}


I'm not going to get into the details of the JavaScript in this posting. Basically all it does is check to see if there is character in the number that is not a digit between zero and nine. Note that the code refers to the Lectora variables you previously created with the prefix "Var". If you did not use the same variable name (including letter case) that I used, then you will need to go back and change your variable names in Lectora or adjust the JavaScript code accordingly.

3. Call the JavaScript from Lectora

To call JavaScript from Lectora, you need to use a little trickery. Create the following variable:
  • Open up the Variable Manager from the Tools menu.
  • Add a variable named "Lectora_JavaScript" using the default settings
Stay with me. This is getting slightly illogical so if you like your Lectora code always in perfect harmony then your eye may be starting to twitch right about now. You will see why you are doing this in the next step.
  • Add the following action to the Calculate Months action group you created in the Math the Lectora Way post. Put it in the first spot so that it is called first.
    • Action Name: Call js_validateNumber
    • Action: Modify Variable
    • Target: Lectora_JavaScript
    • Value: JavaScript:validateNumber()
    • Modification Type: Set Variable Contents


Using the Value field to call the JavaScript is the trick necessary to make Lectora talk to JavaScript. Note that if you have coded in JavaScript before, you may be tempted to add a semi-colon at the end of the JavaScript call. Don't do it! Errors await those who do not heed this warning. ;)

4. Make decisions based on the answer to the question "Is this a number?"

The answer to this question is stored in the variable IsNumber using the JavaScript code.
  • Edit the Action Multiple by 12
    • Click on the Condition tab
      • Check the box next to "Perform action ONLY if the following is TRUE."
      • Variable: IsNumber
      • Relationship: Equal To
      • Value: yes
  • Edit the Action Update Months
    • Click on the Condition tab
      • Check the box next to "Perform action ONLY if the following is TRUE."
      • Variable: IsNumber
      • Relationship: Equal To
      • Value: yes
    • Click on the Else tab
      • Check the box next to "If the conditions are not met, perform the following action."
      • Action: Display Message
      • Target: Standard Message Window
      • Message to Display: Please use numbers only.

5. Finally, Test the Project

Use Mode > Preview in Browser > Internet Explorer to preview your project. Use the web browser for preview rather than Lectora's built in preview so that the JavaScript will be executed. This code has not been tested in web browsers other than Internet Explorer.

If the value you enter is not a number, the you will see the pop-up message "Please use numbers only." If the value you enter is a number, you see it calculated as before in the Math the Lectora Way post.


Now you have the knowledge to practice some JavaScript voodoo. Remember, with great power comes great responsibility. Use wisely and enjoy.

Saturday, September 5, 2009

Math the Lectora Way

Lectora has some basic math functionality you can use to add, subtract, multiply, and divide variables. This comes in very useful for projects that require basic computation. For more complex computation you can add JavaScript to the project. For now, we'll stick with what Lectora has built in.

For this example, we'll calculate the total number of months in a specified number of years.

Prerequisites
  • You should be familar with Lectora
  • You should have a basic understanding of actions and action groups

1. Create a page in Lectora

First, create a blank project in Lectora or create a new page in an existing project.

2. Add the Required Objects

Add a text box. The text box can sometimes be hard to find. Go to Add >> Object >> Form Object >> Entry Field. Name the textbox "Years". Name the associated variable "Years" also.

Add a button. Label the button "Calculate Months".

Add a label. This is where we will but the results. Name it "Months".

You should now have something that looks similar to the following:


3. Create the Action Group

Create an action group. Name it "Calculate Months". Your tree view in Lectora should now look something like the following:


You'll be adding two actions to the action group. The first action will calculate the months. The second action will update the page with the new value. You will need to make sure these are ordered as stated to display the correct results.

Add a Modify Variable Action. This is where you will do the calculation of years to months by multipling by 12. Notice the calcuation will change the value of the variable "Years" to months. Set the following:
  • Action Name: Multiply by 12
  • Action: Modify Variable
  • Target: Years
  • Value: 12
  • Modification Type: Multiply Variable By


Add a Change Contents Action. This will display the resultant number of months (now in the variable "Years") to the learner. Set the following:
  • Action Name: Update Months
  • Action: Change Contents
  • Target: Months
  • New Content: Years


4. Link the Action Group to the Button

Now you will need to go back to the button and edit it so that when the learner clicks it, the calculation will be made. Go into the button properties and choose the "On Click" tab. Set the following:
  • Action: Run Action Group
  • Target: Calculate Months

5. Preview the Project

All that is left to do is to see the code in action. Preview the project and notice any number you put in will be calculated into months when you click the button.


What happens if you don't put in a number? The calculation will not work and the text will show up in the results.


You may want to check the value in the years textbox to make sure it only contains numbers. Otherwise, you'll want to let your learner know it is not a valid number. For this you will need JavaScript. Look for a follow-up posting on that topic!

Saturday, August 22, 2009

Using Captivate 4's System Variables

One of the new features of Captivate 4 is the ability to access and use system variables. I recently was able to explore how these might be used to turn on and off the navigation bar within the skin of my Captivate lesson.

Many designers include assessments within their Captivate lessons. During the informational and practice portions of the lesson, the students can use the navigation bar included with the Captivate skin to proceed through the lesson. However, when they reach the assessment, it's often desirable to disable navigation back to the course content so that the assessment is a true test of what the student can recall. Upon arriving on the scoring and results page, the navigation bar would be turned back on and the student would be able to review the lesson and retake the assessment if necessary.

Now that I've covered why we might want to access these system variables, without further ado, below are the steps I took to accomplish this.

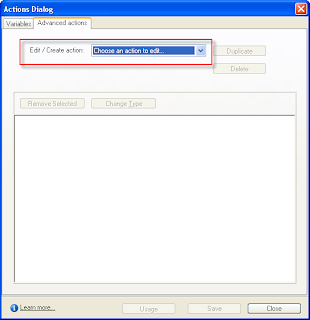
First you need to set up Advanced Actions to turn on and off the navigation bar.

1. Select Project > Actions from the menu and click the Advanced Actions tab.
2. In the Edit / Create Action drop-down, select "Create a new action." Result: A "New action name" field appears

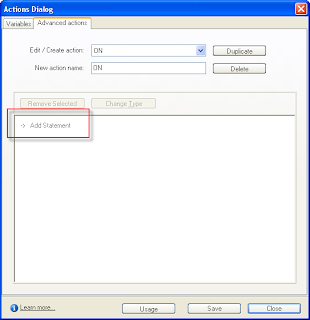
3. Enter a simple and descriptive name for the action.
4. Click Save.
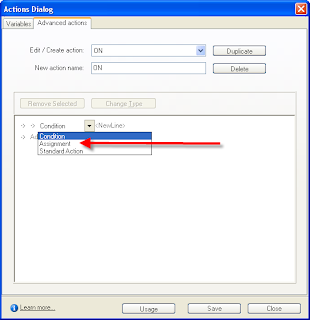
5. Double click on the "Add Statement" text that now appears and double-click again to see a drop-down list.

6. Select Assignment. Result: the system variables will replace the current drop-down options.

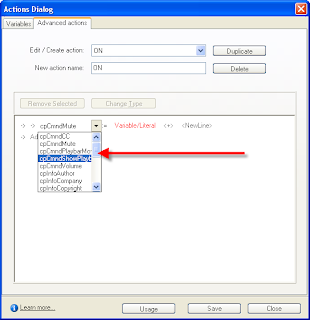
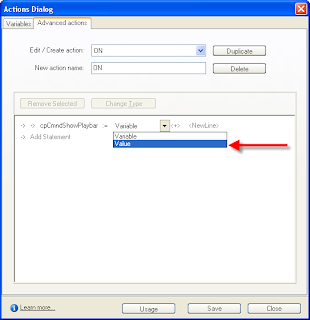
7. Select cpCmndShowPlaybar. The variable will display now with an equal sign to the right of it. To the right of the equal sign, a drop-down appears with the options of Variable or Value.

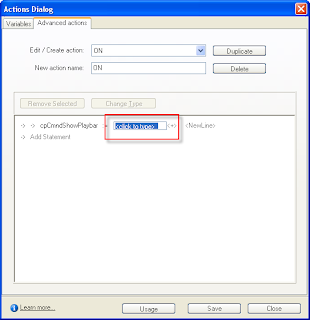
8. Select Value. A text entry prompt will appear.

9. Enter the value of 1 to turn on the Nav Bar. (Enter a value of 0 to turn off the Nav Bar.)

10. Click Save.
11. Repeat the steps above to create an action to turn the navigation bar off.

Now, here is how we used these actions within the Captivate lesson itself.

1. On the assessment introduction slide, add a start button with the setting "Go to next slide" when students click the button. (This is obviously important as the student will have no other means to navigate once the navigation bar is turned off! You could choose to place this action where-ever it makes sense in your own course.)
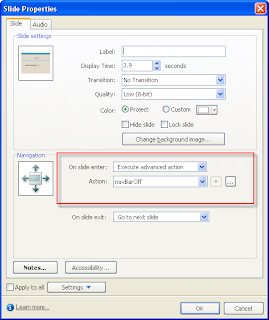
2. Select Slide> Properties from the menu.
3. Change the "On slide enter" value to "Execute advanced action." A second drop-down will appear with the actions you set up.
4. Select the action to turn the navigation bar off.
5. Select the slide where you would like to turn the navigation bar back on and repeat steps 2 and 3, this time selecting the action to turn the navigation bar on.


Test your results! NOTE: I have not tested all different publishing options with this setting, so it may help you to know that I published this to Flash Player 9 and ActionScript 3.

Sunday, August 16, 2009

Understanding Web 2.0

Do you know the reasoning behind why the world-wide web was created? (Hint: it was not to exchange music and books for credit card information) It was created to help people share information. Actually it was created for physicists across the world to share information in an easy to read format. They shared this information through documents connected together through hyperlinks. It's not that far of a stretch to say it was created to be the ultimate e-Learning tool.

As the web transformed over time people discovered that the ability to collaborate on projects over the web made it an even more powerful tool for sharing information. The ability to collaboratively work on documents, to share web services, and use software on the web instead of installing it on your computer is what many people refer to as web 2.0. Web 2.0 has opened many doors for new businesses, as well as, new e-Learning opportunities.

Wikipedia has a write up on Web 2.0 where you can get some background on Darcy DiNucci's mention of the term "web 2.0" in 1999, followed by Tim O'Reilly in 2004, and then the 2006 Time magazine article Person of the Year - "You". You may even want to check out the original web 2.0 wikipedia entry first written in February of 2005 to get a better appreciation of how this terminology has morphed (somewhat) over time.

Christopher Barnatt explains web 2.0 in a clear way that helps to define what Web 2.0 means versus the hyperlink focused Web as it emerged in the 1990's. Take a look at the following video.


The ideas that make up Web 2.0 are social networking, web mashups, and using the web to store and create content.

1. Social networking is a crazy buzz word right now. "Follow me on Twitter" has become a popular fad for people to market themselves. Twitter, a micro-blogging and status update technology, is one of among many ways that web users are using social technology to share information. I think of popular web based social networking technologies as breaking down into three categories. Object centric networks like Flickr and YouTube use content as the impetus of social networking. Ego centric networks like Facebook, Linked In, Blogs, and Twitter use human instigated actions as the impetus for social networking. And finally, knowledge centric networks like Wikipedia and other wikis use information as an impetus for social networking.

2. A web mashup is the second concept in what makes up Web 2.0. Web mashups make sharing information easier by allowing web technologies to comunicate with each other through web services and other technologies. A web user may see one page of information but it can come from more than one web technology or provider. One example of this is Woozer which combines Google Maps and Weather.com technologies to give 10 day forecasts from all over the world. The Twitter API has been used over and over to create a plethora of cool little Twitter based apps. Many mashups are done to combine air, hotel, and other reservation technologies to provide travel services in a one shop location. Another simple way to mashup web information would be to embed objects like YouTube videos, SlideShare demonstrations, and Google Calendar into your web page. iGoogle does a good job of this type of mashup by aggregation.

3. Using the web to create, edit, and store information is a relatively new concept. While the idea has been around for a while, it is only recently that speed, reliaility, and consistency among web standards have made this practical. However, even today you'll here people still complaining about the errors or slow response times of web applications. One of the most popular web applications now-a-days is Google Docs. Google Docs allows people with Google accounts to create and edit common office documents like word documents and spreadsheets. With the release of Microsoft Office 2010 (See Office Web Apps), you'll have similar functionality from a Microsoft product. With these applications, not only do you have the ability to do all your work online (no software to install), you can also collaborate with people so that more than one person can view and edit the document you are working on. This type of social collaboration really solidifies this as a web 2.0 product. Another good example of a software service is the online mind mapping (or brainstorming) software by Mindomo. Mindomo does not have the collaborative authoring component but there are similar products that do.

So what is the impact Web 2.0 has on e-Learning? Web 2.0, as I've described it here, is one more tool that can be applied to create a better quality training environment. It does not replace any one particular technology. Each technology has it's strengths and weaknesses. For example, if you followed some of my links to Wikipedia, you probably noticed some of its weaknesses. The articles written are targeted towards a broad audience and some of them are not even written well for a broad audience. Work place training is always most effective when it is targeted to a specific audience and attached to specific performance goals. From that perspective collaborative knowledge tools like wikis, while great for collecting ad hoc information, will not replace a well designed and performance targeted self-paced web course. However, Web 2.0 technologies are "living" technologies that are constantly updated and can provide a quick way to get information updated.

I hope I've been able to help build your definition of what Web 2.0 is. What did I leave out? What is your perspective? How are you using it in your training?

Saturday, July 25, 2009

Pointing to the Five Moments of Learning Need

By Jay Lambert

I can remember a project a few years ago where the subject matter expert (SME) fought and fought to include his 20-step process (complete with details and charts) in the course we were developing. He eventually persuaded his boss and won out, so we built the process into the course. Feedback from the learners was not positive and ranged from comments like "what is this and why in the world would I need to know it" on down to, shall we say, less positive remarks.

Obviously a better needs analysis should have been conducted.

And so upon further investigation, the truth of the matter finally came out. Only a small percentage of people really needed to know the full details of the process; most just needed to know that it existed. The course should have simply provided a brief introduction and a link to where to find more information on the company's intranet if necessary. But the SME was so enamored with what he had created that he wanted to share his joy with the rest of the world.

I'm sure that most of you have encountered the same SME.

There are two purposes to this story. The first is to highlight again how important it is to understand what content really needs to make its way into an eLearning course and what is just extra "nice to know." The second purpose is to ask ourselves what should become of that "nice to know" content.

This is where Bob Mosher and Conrad Gottfredson’s great research on their
Performance Support Blog comes in. They've identified 'Five Moments of Learning Need' and matched these needs to their most effective delivery method. Not surprisingly, only two of the five needs call for training development.
Gottfredson’s 'Five Moments of Learning Need'
Note that only Needs 1 and 2 ("when learning for the first time" and "when learning more") require training. The rest is simply information that people need to know at a specific time -- the "what if this happens" scenario. Deeper dive information, such as in-depth details of a process, certainly falls into Need 3 ("when remembering and/or applying what's been learned"). This content can be presented as job aids, as part of an electronic performance support system (EPSS), or simply housed on the company intranet somewhere as long as people know where to find it when they need to do so.

The Moments of Learning Need came in handy recently when we encountered the same SME (different person, but same approach).


After determining that the eLearning course's objective was to provide a reasonable overview and then knowledge of where to go for more information as learners need it, we pulled out the Moments of Learning Need as part of our discussion/intervention with the SME. And he accepted it (people like documented research). The extra details were put on to the company intranet where they could easily be maintained and referenced. And a nice targeted course was developed that included an activity of how to find the extra details when necessary. This is all the learners needed and thankfully all they received.

We'll definitely be keeping the Moments of Learning Need document close by.

Saturday, July 18, 2009

Google Calendar in Lectora

by Jonathan Shoaf

I'm a big fan of Google and I use Google's online applications on a daily basis. I've found the Google Calendar to be easy to use and easy to access at home, at work, and on the go. When I was recently asked to teach a class on how to use Google Calendar I started thinking about how to integrate it with Lectora. Having a calendar in your training can be useful for a variety of reasons. Embedding a calendar in your Lectora training can be done through Lectora's External HTML object. This lesson shows you how to do this.

Prerequisites

This lesson assumes you have a Google Account and that you have created a Google Calendar. To set up an account go to http://calendar.google.com.

1. Start in Lectora

First, create a blank project in Lectora or create a new page in an existing project.

2. Grab Code Snippet from Google Calendar

Log-in to Google Calendar. Click on the down arrow next to the calendar you want to embed in Lectora.


In calendar settings, scroll down the the Embed This Calendar section. You could use the code in the text box to embed the calendar in the Lectora project. However, we want to customize the code so that it is the correct size for our project. Click on the link Customize the color, size, and other options.


For this project the width should be adjusted to 600 and the height should be adjusted to 450 so that the calendar will fit correctly on the Lectora page.


When you have entered the width and height, click Update HTML then select and copy the code from the text box (see below). You will paste this code in Lectora in an upcoming step.


3. Paste Code Snippet into Lectora

Go back to the Lectora program. From the Add menu choose Object then External HTML. You'll see the following dialog box.


Give the object a name, in this case "Google Calendar". The object type should be set to "Other". Next is the important part. Paste the code block from Google Calendar in to the text box for Custom HTML.

Next, go to the Position and Size tab to adjust the width and height. Based on the settings we gave the calendar in Google, the width should be 600 and the height 450. Click OK to accept the changes.


Finally, position the External HTML in your Lectora project. You should see something similar to the following screen shot. Notice the Google Calendar is not visible in edit mode. It will not be visible until it is previewed in a web browser.


4. Preview in a Web Browser

Previewing the project in a web browser will result in something similar to the following screen shot. The calendar is interactive so the user can change the date, view mode, and see details on events.